
Today we have a great fall string pumpkin craft. Kids of all ages, and adults, will love making this string pumpkin craft. This budget-friendly pumpkin craft only takes a few items, some you may already at home or can get for cheap. This string pumpkin craft is great for a fall craft and even makes super cute fall decorations.

Sugar STring Pumpkin Craft
This sugar string pumpkin craft turns out amazing and is surprisingly easy to make with kids. We are going to show you the simple steps to create a decorative pumpkin with just sugar, water and string. This sugar string crafting technique can be used for all sorts of crafty things with kids of all ages.
The project I am sharing today turned out AMAZING. I am not even kidding. My 7 y/o and I made them together and we are incredibly proud of the result and plan on decorating around them for Thanksgiving.
This article contains affiliate links.
Related: More balloon string art
Supplies Needed To Make This String Pumpkin Craft
- 1 cup sugar
- 1/2 cup of warm water
- Colored string or twine
- Scissors
- Balloons
- Bowl that balloon (filled with air) will fit into
- Ribbon or rafia

Directions to Make a Sugar String Pumpkin Craft
Step 1
We blew up 5 balloons of various sizes. I tried to keep the balloons round vs. egg-shaped since we are making pumpkins.
Step 2
Each balloon was wrapped with colored cotton crochet string. We used brown and rust since our local craft store was out of a bright orange color.
Step 3
For the 5 balloons, I doubled the recipe and used 1 cup hot water & 2 cups of sugar.
Step 4
Once the sugar dissolved, we dipped the string-wrapped balloons into a large bowl of the sugar syrup rotating it around until all the string was well covered.
Step 5
Then we washed our hands because it is STICKY!
Step 6
We hung the balloons outside on our play set from additional string and watched them dry in the sun attracting neighborhood bees. It took about 24 hours to dry. If you are drying them inside, do it over a sink and use a fan to get the same result.
Step 7
Rhett was super excited to pop the balloons once the string was dry. He pierced it with a pair of scissors and then pushed the balloon inward to detach it from the string. The pop makes a fun noise, but so does the balloon contracting away from the sugar-attached string.
Step 8
We pulled the deflated balloon out of the top of the string pumpkin.
Step 9
I wrapped rafia pumpkin stems and placed one in the hole at the top of each string pumpkin.
Step 10
We placed them on the table for the perfect Thanksgiving centerpiece.
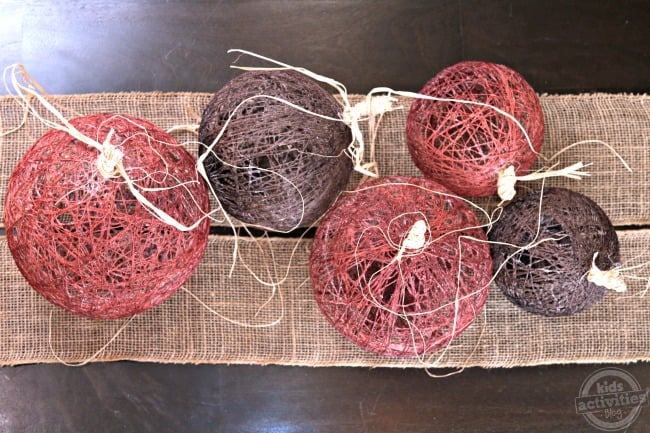
Finished Sugar STring Craft Project
It was that easy. It was also very inexpensive – for the price of 2 cups of sugar and a little string & leftover rafia, we have a centerpiece!
We are already planning some sugar string Christmas ornaments.
Fall String Pumpkin Craft

Grab some string, sugar, balloons, and water to make these super cute fall string pumpkins. This string pumpkin craft is not only fun to make, but it is a budget-friendly fall craft that kids of all ages and adults can make. They make the best fall décor!
Materials
- 1 cup sugar
- 1/2 cup of warm water
- Colored string or twine
- Scissors
- Balloons
- Bowl that balloon (filled with air) will fit into
- Ribbon or rafia
Instructions
- Blow up 5 balloons, all different sizes. Try to keep them round rather than egg shaped.
- Wrap each balloon with colored cotton crochet string. Use fall colors like: orange, brown, red, gold, yellow.
- Use 1 cup hot water and 2 cups of sugar. Make sure sugar is dissolved in the hot water before starting.
- Dip the string wrapped balloons into a large bowl of the simple syrup. Make sure the entire balloon is covered.
- Hand the balloons and allow them to dry for 24 hours. If drying inside, do so over the sink.
- Pierce the balloons carefully and gently push the balloon out of the strings.
- Wrap the rafia pumpkin stems and place on on the hole at the top of each string ball.
- Use them as decorations!
More String Crafts from Kids Activities Blog
- Turn string into friendship bracelets
- How to make pinatas with pull strings
- Make your own sticky sticks
- Make string paint art
- String art templates
- Oh so many string art ideas!
- Try out this beautiful book pumpkin hack, perfect to put on display this fall!
- Make 30+ Easy Pumpkin Crafts for Kids, to go along with your sugar string pumpkin craft!
- For some easy pumpkin fun, check out these pumpkin patch coloring pages!
- Make this cute pumpkin paper craft!
How did your sugar string pumpkins turn out?


I love this. I have never heard of doing this with sugar. Today my son and I tried it with yarn and glue. It is not dry yet so I don’t know if it turned out. I am happy to hear that someone else does lots of project with their kids and many of them are not really photo quality. My son and I do crafts often an few turn out beautiful (he is only 3). I love the time we spend creating and hope I am helping him to have wonderful memories. Anyways this is one I will have to try. I think we will make them smaller and create christmas ornament. Thanks for the post.
I made Easter egg decorations with my Day Care kids years ago this way. Such fun!